
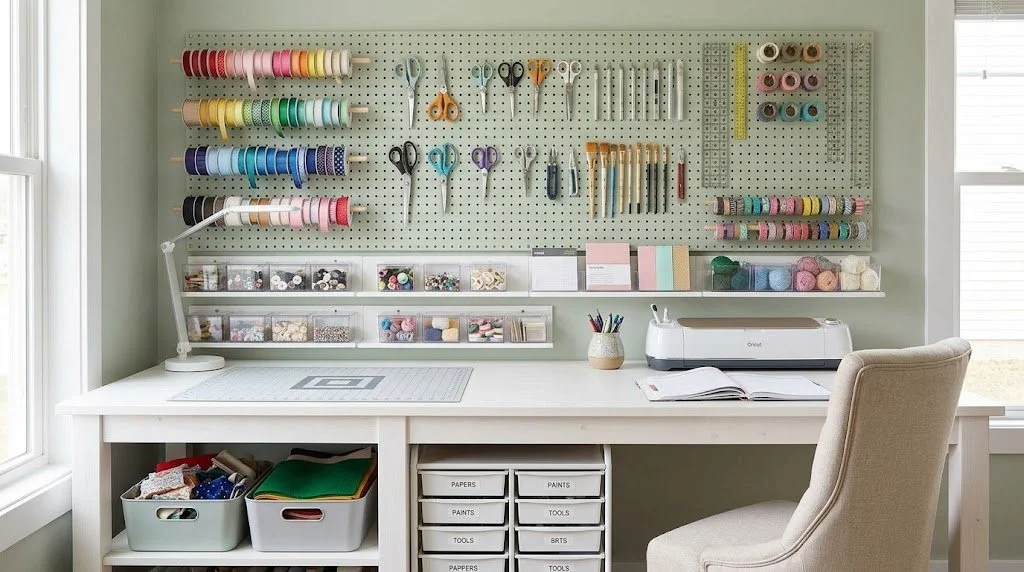
A craft station with storage can make creative time feel easier, calmer, and far less messy. The goal is not to create a picture-perfect room that nobody wants to touch. The goal is to give your supplies a home, keep your work surface usable, and make it simple to start the project you have been thinking about.
Start With Your Real Craft Habits
Before building a craft station with storage, look at what you truly make. Someone who sews needs a very different setup than someone who paints, scrapbooks, or works with paper. The best systems begin with your routines, your favorite supplies, and the amount of space you really have.
Take out your materials and sort them by type. Keep your most-used supplies near your work surface, then move backup materials into deeper storage. A paintbrush used every week belongs within reach, while extra canvases can live on a higher shelf. This simple decision saves time and keeps the craft area from feeling crowded.
It also helps to notice what gets messy fastest. If small beads always end up everywhere, they need closed containers. If you keep hunting for scissors, they need one dependable home. A craft station with storage works best when it solves the little frustrations that make you walk away halfway through a project.
Create A Work Surface That Stays Open
A good work surface does not need to be fancy. It can be a desk, a folding table, part of a dining room, or a small corner in a spare bedroom. What matters is having enough open space to work without pushing piles aside first.
Try to keep the center of the table free when you are done. Store active projects in trays, bins, or portable project bags that can move off the surface when life gets busy. This helps you return to the project later without losing your place or taking over the whole room.
A craft station with storage should support creative energy, not create another chore. If setting up takes twenty minutes, the supplies will probably stay in the closet. Keep basic tools easy to grab so you can sit down and begin without a scavenger hunt.
Give Every Supply A Category
Categories are what make a craft station with storage work over time. Group supplies by how you use them, not only by what they look like. For example, a paper crafter may keep cutting tools together, adhesives together, and finished paper in another zone.
Clear containers are useful for supplies that need to stay visible. This works especially well for ribbons, markers, stickers, small paint bottles, and sewing notions. You can see what you have without pulling out five bins, which makes cleanup easier too.
Closed storage is often better for messier items or visual clutter. A drawer can hold glue sticks, backup pens, or rolls of tape without making the room feel busy. If you use open shelving, give each shelf a purpose so it does not slowly turn into a dumping ground.
Labels help everyone in the household understand the system. You do not need to label every pencil, but bins for “painting,” “paper,” “fabric,” or “kids crafts” can make a big difference. It also makes putting things away far less mysterious after a fun project gets a little wild.
Think About Vertical Space
A craft station with storage often needs to work in a small area. When floor space is limited, look up. Wall shelves, pegboards, hooks, and vertical file holders can store supplies without taking over the table.
Pegboards are helpful for tools that need to stay visible and easy to reach. Scissors, rulers, cutting mats, and small baskets can hang where you can see them. This can be especially useful for people who forget about supplies when they are hidden in deep drawers.
Shelving is good for bins and larger materials, but keep frequently used items between waist and shoulder height. High shelves work best for backup supplies or seasonal projects. There is no reason to climb on a chair every time you need a glue stick.
If your craft supplies share space with an office, guest room, or family area, vertical storage can keep the room looking more peaceful. A few well-chosen containers can hold plenty without making the area feel like a supply closet exploded.
Keep Projects From Taking Over
The tricky part of a craft station with storage is often unfinished projects. They can spread across the table, move to the kitchen counter, and eventually get buried under mail. A project zone can keep that from happening.
Use a shallow bin, tray, rolling cart, or zippered bag for each active project. Put the materials, instructions, and tools together when you stop for the day. The next time you have twenty free minutes, you can pick it up again without looking for missing pieces.
This is also a good reason to limit the number of projects that stay active. A handful is usually manageable. Too many open projects can start to feel like guilt with glitter on it. Finished work deserves a home too, especially if you create gifts, artwork, or items you want to sell.
If you are building a craft area in a busy home, An Organized Life can help create systems that are functional and attractive. The team works with clients to build organizing solutions that support real routines, so your supplies can stay accessible without taking over the entire room.
Make Cleanup Part Of The Process
Cleanup does not need to be the least fun part of crafting. A simple reset makes it easier to enjoy the next project, and it keeps your supplies from becoming a tangled pile. Keep a small trash can nearby, along with a place for recycling scraps and returning tools.
End each session by putting away the items you touched. You do not need to reorganize the entire craft station every time. Put the current project in its container, wipe the table, and return the tools that belong in easy-to-reach spots.
A craft station with storage should not rely on motivation alone. It should make cleanup quick enough that you can do it even after a long day. If the system feels hard to maintain, it may need fewer categories, larger containers, or a simpler layout.
For more information about the hands-on organizing approach behind this kind of work, visit MJ Rosenthal’s about page. Her approach focuses on customized solutions that help clients maintain balance and control over their spaces.
FAQs
What should be included in a craft station with storage?
Keep a work surface, daily-use tools, containers for supplies, and a place for active projects. The setup should match the crafts you enjoy most often.
Do I need a separate room for crafting?
No. A craft station can fit in a closet, a corner of a family room, a home office, or even a portable cart. The system matters more than the size of the room.
How do I store small craft supplies?
Use small labeled containers, drawer organizers, or clear bins. Keep similar items together so you can find what you need without emptying everything out.
How can I keep my craft table from becoming cluttered?
Keep only one or two active projects on the table. Store unfinished work in trays or containers when you are done for the day.
Should craft supplies be stored in clear bins?
Clear bins work well for items you need to see quickly. Closed bins may work better for items that create visual clutter or do not need daily access.
Can a professional organizer help set up a craft space?
Yes. We can help you sort supplies, create zones, and build storage systems that make the space easier to use. You can schedule a consultation when you are ready for hands-on support.
Give Your Creativity More Room
If you want a craft station with storage that feels inspiring instead of overwhelming, contact An Organized Life. We can help you create a space that makes it easier to start, create, and clean up.